Friday, July 10, 2015

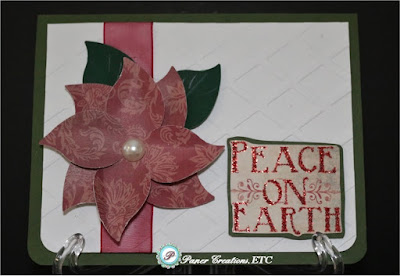
Poinsettia Christmas Card

Yesterday, despite the heat and humidity, I decided to finally plant some flowers and new plants in our front yard. It looks so pretty. We had to choose special roses for the kind of weather we have, warm and humid most of the time that is. I would love to have some poinsettias, but they wouldn't survive. But I can always buy them around Christmas time, and make some paper ones for my cards, right? So here is a card with a sort of poinsettia made with a leaf paper punch.

Supplies used
Paper: Green, white, leaf green, and patterned cardstock
Tools: Cutting/embossing machine, diamond embossing folder (The Paper Studios), leaf punch (Ek Tools), precision scissors, round edge punch.
Embellishments: See through red ribbon, pearl sticker, 'Peace on Earth' vintage homemade sticker, paper poinsettia
This card is not difficult to make at all, and it can be used not only for Christmas, but for a winter birthday too - just change the sentiment.

Thank you for checking out my paper creations. I hope you have a wonderfully blessed weekend.
Vanías Reed   
 

Thursday, July 9, 2015

No-bake Dessert

We are going to make a brief pause on Christmas cards because I need to post this recipe, as I promised on my Facebook page. I made it for 4th of July. You can decorate it the way you want, even with Christmas eatable decorations. ;) But first let me tell you a little bit about this delicious Brazilian dessert. The name in Portuguese is Pavê (Trifle) .
Pavê resembles a tiramisu, but ... much better! It is a wonderful no-bake layered dessert made with different types of creams and cookies, or biscuits. The most common one is made with Lady Fingers and white cream. The recipe I'm posting today is my creation, and, therefore, made with chocolate. Yep, I confess, I am a chocoholic. (smile). But doesn't everything taste better with chocolate anyway? (bigger smile).

Ingredients
3 packages Tea Biscuits (you can use Graham Crackers, if you prefer)
1 can sweet condensed milk 
3 tbsp Nesquick
1 can table cream (you'll find table cream at the international aisle of your grocery store)
1/2 cup milk 
1 tbsp butter
1/4 cup sugar (optional)
2 8oz containers Whip Cream
Fresh fruit (I used raspberries and blueberries to make the flag), or any decoration of your choice.


In a medium saucepan over medium heat, combine Nesquick, butter, and sweet condensed milk. Cook in medium heat stirring constantly until it thickens and loosens from the bottom of the pan (about 10 minutes). Turn off heat. Add table cream. Mix very well until you have a smooth (almost liquid) cream. 
Put milk in a deep dish (add sugar to the milk if you like your desserts very sweet). One by one, deep the biscuits in the milk and arrange them in a 9"x 13" baking pan. Cover the biscuit layer with chocolate cream. Repeat this process 2 more times. Spread whip cream on top, decorate, put in refrigerator at least for 2 hours before serving. Enjoy!

Let me know in a comment how your dessert turned out. Please post a picture of it on my Facebook page.
Thank you for stopping by. May God bless you and yours,
Vanías Reed  

Tuesday, July 7, 2015

Winter Scene Christmas Card

Today is one of those summer days with lots of rain. A day like this reminds me of Christmas in my country. I remember getting in stores to buy gifts for family members, and being 'stuck' there for a while because of the rain. I also remember being in a pool with my siblings and cousins on Christmas Day. Isn't it amazing how the weather can take us on a memory journey? Anyway today I'm posting a Christmas card that is the opposite of Christmas in Brazil. This card has everything to do with Christmas in the northern U.S. and other parts of the world where it snows in December.

Supplies used
Paper: Plain white and glitter white cardstock, gold scrapbook paper
Tools: Cutting/embossing machine, landscape stitched die, dryer sheet (it makes the glitter pop out), spray adhesive, snowflakes border punch, gold glitter gel pen, winter wonderland fine glitter
Stamps: merry Christmas, and evergreen forest
Ink: Black and evergreen 
Embellishments: squirrel sticker, snowflakes, pearls, star
  Thank you for stopping by. Celebrate the Real Reason for CHRISTtmas.
Vanías Reed  

Monday, July 6, 2015

Christmas in July - card #2

Those who know me, know how much I love Christmas, therefore, it's needless to say that I'm enjoying to watch Christmas movies at Hallmark channel. So, in the Christmas in July spirit, here is another card. This one was inspired by a class I watched on Craftsy

Supplies used
Paper: Solid white, red, golden,  patterned green, red and beige cardstock paper
Tools: Cutting/embossing machine (Sizzix), stripes embossing folder (The Paper Studios), precision scissors, 3D foam adhesive dots
Embellishments: clear gemstones, "Joyous" homemade sticker


If you speak/ understand Portuguese, I posted a video tutorial for this card here
Thank you for stopping by, and have a blessed Christmas in July. 
My Redeemer lives!
Vanías Reed