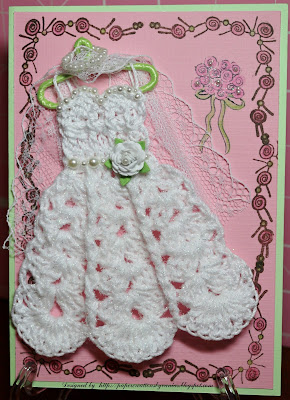
Recently I made some bridal invitations, and they inspired me to create a 'bridal' card. I like to crochet so I decided to put the two together. Here is the result.
Card 'Recipe'
Paper: light green (Paper Studio), pink (Recollections)
Stamp: Wedding series - Roses corner and roses bouquet
Ink: Ebony (Recollections)
Tools: Crochet needles 3.25mm (D), pliers, pink and green coloring pencils, spray adhesive.
Everything else: paper clip (hanger), green ribbon (to cover hanger), white lace (veil), white Red Heart Fashion Crochet Thread, Size 3, adhesive faux pearls (tiny and small) and pearly beads, white paper rose with leaves, Winter Wonderland glitter (Martha Stwart).
Dress directions
Abbreviations:
ch - chain
dc - double crochet
sc - single crochet
sl st - slip stitch
sk - skip
Skirt
Ch 7 then ch 2 to go up.
Row 1: 6 sc , remember that last 2 ch count as 1sc
Row 2: ch 3, remember this is your first dc, 1 dc in every sc
Row 3: ch 3 (your 1st dc), 1dc ch 2 2dc in the same base st, 1 dc 1 row below in the next st, 2dc ch2 2dc in the next st; 1dc 1 row below in the next st; 2dc ch2 2dc in the same st
Row 4: sl st until you reach the ch in the middle of dc from previous row
ch3 (your 1st dc) 1dc ch2 2dc in the ch; sk next 2dc; 1dc 1 row below; sk next 2dc; 2dc ch2 2dc in the ch; sk next 2dc; 1dc row below; sk 2dc; 2dc ch2 2dc in the ch
Row 5: sl st until you reach the ch; ch3 (your 1st dc) 2dc ch 2 3 dc in the ch; sk 2dc; 1 dc 1 row below in the next st; sk 2dc: 3dc ch2 3 dc in the ch; 1dc 1 row bellow; sk 2 dc; 3 dc ch2 3dc in the ch.
Row 6: Repeat row 5 - except that you will sk 3dc this time
Row 7: sl st to ch; ch3 3dc ch2 4dc in the ch; sk 3dc; 1 dc 1 row below in the next st; sk 3dc; 4dc ch2 4dc in the ch; sk 3dc; 1 dc 1 row below; sk 3 dc: 4 dc ch2 4 dc in the ch
Row 8: sl st to ch; ch3 9dc in the ch; sk 4dc; 1 dc 1 row below; sk 4dc; 10dc in the chain; sk 4dc; 1 dc 1 row below; sk 4 dc; 10dc in the chain; sl st to join
Sl st going up the skirt
Spray the skirt with adhesive and sprinkle glitter on it before gluing the dress to the card.
Top
When you get back to the first row of the skirt, (that will be the waist)
Row 1: ch 2, sc in every precious sc (they will be up side down)
Row 2: ch3 (your 1st dc) 1 dc in each sc
Row 3: ch 3 1dc 1 row below; 1 dc; 1dc 1 row below; 1dc; 1dc 1 row below; 1dc
Row 4: Repeat row 3
Row 5: ch 3 2dc in the next 3 dc; sl st; 2 dc in the next 4 st; sl st.
Sl st all the way to the bottom of skirt
Tie off and weave in ends.
 |
| Add a few pearls to the bouquet. |
 |
| Detail inside the card |
Thank you for stopping by. Blessings unto you.
Vanias Reed


