Showing posts with label Fall. Show all posts

Sunday, October 18, 2015

Thanksgiving Card + Tips + FREE Template

Hi there. I absolutely love this time of the year. The temperature is lower, it is not so humid, and we can go back to enjoy outside. Besides, it tells me that Christmas is coming. Yay!!! So today I'm posting a last idea for Thanksgiving before I start posting Christmas ideas. Here it is.
Supplies needed for this card
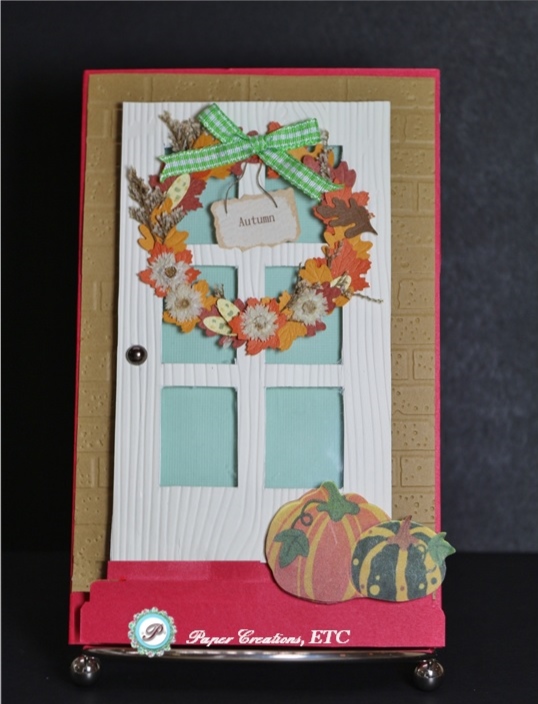
Paper: Red, light brown, aqua green, and white cardstock, transparency
Tools: Cutting/embossing machine, bricks embossing folder, wood embossing folder, door die or use the template below
Embellishments: handmade pumpkin sticker, fall wreath sticker, brown self-adhesive brown pearl (for door knob)

Tips
1. The wood embossing folder from Sizzix embosses very deeply. If you have a light weight paper, it will tear it. So, emboss it without the flaps on the base for the cutting machine. Like if you were going to use a die to cut a shape. If you paper is really thin, place a piece of velum inside the embossing folder with the paper you will emboss. You will still see through the velum, and have a beautifully embossed image
2. You don't have the sticker, stamp, or picture that you'd like to have? No problem, cut out pictures from magazines. Glue them on heavy weight cardstock, cut out, and if you want a glossy effect, cover them with Glossy Accents. 

Door Template
Right click on picture to save in your computer to print.

Thank you so much for stopping by, and have a wonderfully blessed week
Vanías Reed 

Saturday, October 10, 2015

Easy Thanksgiving Card + Tips

Hi there. I'm so carried on making Christmas cards for children who live below poverty level, that I forgot to post another Thanksgiving card like I said I would. Oops. You can make a child smile with a simple card too. You can make your cards and send to 
Compassion International, ATTN: Christmas Cards for Unsponsored Children Colorado Springs, CO 80997-0004
Just sign your cards,  and write a Bible verse that will encourage the children. Place each card in an blank envelope, then send them to the address above. The dateline is November 2nd.  If you have any questions, please ask them in a comment, and I will answer them as soon as possible. Meanwhile, here is another Thanksgiving card.


Supplies used for this card
Paper: Rusty red, white cardstock, patterned brown, green, golden yellow, and orange scrapbook paper
Tools: Scoring board and scoring tool, maple leaf punch, corner round punch
Stamp: Grateful (Stampabilities)
Ink: Expresso

Tip# 1: The embossing lines on the side, bottom and top of the card were made with my scoring tool on the scoring board. You can use a click pen (with the point inside), and a cutting board to score too. Like seen in this FREE video class

Tip# 2 I made this card without any 3D embellishments because it's going to be mailed. You can use a snowflake punch, for instance, and a Christmas sentiment phrase, to turn the card into a Christmas one. 

Thank you so much for checking out my blog. Enjoy crafting, and don't forget to share your creativity with those in need. ;)
God bless you,
Vanías Reed

Monday, October 5, 2015

Card + Tip on Distress Technique

It was 67 degrees when I went outside this morning. Boy did it feel good! I am one of those people who enjoy cool weather way better than the heat of summer. I always say that you can put on layers of clothes and be warm, but there is only so much you can take off. (LOL). Anyway, the cooler weather, the beautiful autumn colors - at least in my home fall decor (smile), and the Christmas items for sale in stores remind me that we are so close to Thanksgiving. Since I started on my Christmas cards in July, I just had Thanksgiving cards to make. Hoot-hoot!. So here is the first one.

Supplies used
Paper: Rusty red, brown, olive green, and cream cardstock paper
Tools: Cutting/embossing machine, wood marks embossing folder, fancy scallop oval punch, small oval die, stamp marker
Stamp: "Count your many blessings..." - I used the stamp marker on the words many and blessings, and stamped them separately.
Ink: black and brown
Embellishments: Pumpkin and acorn 3D stickers, brown twine, small brown pearl  

Tip: Use the stamp pad to gently touch several times the edges of the cream paper to give the distressed look to it.

Thank you for stopping by. God bless you and yours.
Vanías Reed  

Thursday, October 1, 2015

Cornbread/ Pão de Milho

My cousin and aunt came from Brasil to visit, and I decided to make a roast, and serve it with cornbread. They liked it so much that my cousin asked me for the cornbread recipe. Since I had to translate the recipe, I thought, "Why not share it with other people too? After all, Thanksgiving is around the corner, the colder weather will be here soon..." So here is the recipe in English and Portuguese.
 

Cornbread Recipe in English

1 ½ Cups yellow corn meal
1 ½ cups all-purpose flour
1/4 cup sugar
1 ½ tbsp baking powder
1 tsp salt
1 ¼ cup milk
2 eggs
¼ cup vegetable oil
¼ cup butter

Heat oven to 250F
In a medium bowl combine dry ingredients. Add milk, eggs, and oil. Blend until smooth. Melt butter in iron skillet at 250F(see note below for glass baking pan). Pour batter evenly into skillet. Cover with tin foil, bake at 250F for 20-25 minutes or until golden. Stick a toothpick – CAREFULLY not to get burned – into center of batter. If the toothpick comes out dry, the bread is ready. Enjoy!

NOTE: If using a 9 x 13in glass baking pan, melt the butter in a microwavable container, in microwave, then spread into baking pan before pouring batter in.

Thank you for stopping by. Enjoy the cool weather, and God bless you. 
Vanías Reed

 Receita de Pão de Milho em Português
 1 ½ xic de fubá

1 ½ xic farinha de trigo
1/4 xic de açúcar
1 ½ colher de sopa de fermento em pó
1 colher de chá de sal
1 ¼ xic. de leite
2 ovos
¼ óleo vegetal
¼ xicara de manteiga

Aqueça o forno a  125 graus C
Misture os ingredients secos. Acrescente o leite, os ovos e o óleo. Misture tudo muito bem.
Aqueça uma frigideira de ferro e derreta a manteiga nela.
NOTA: Se usar refratário, derreta a manteiga no microoondas primeiro, ai espalhe a manteira derretida no refratario.
Despeje a massa na frigideira de ferro, ou no refratário e asse por 20-15 minutos. Espete o centro da massa com um palito de dentes ou espeto de churrasco. Se o palito/espeto sair seco, o pão está pronto. Aproveite.
Obrigada por visitar o meu blog. Deus abençoe,
Vanías Reed 


Tuesday, September 29, 2015

DIY Any Season, Inexpensive, and Easy Wreath + Bow tutorial

Hello. Who is enjoying the cooler weather? I know I would, if we had any. But it is still pretty warm here. That, though, does not stop me from decorating my home with fall colors, and changing my screen saver to a fall one. I just love the gorgeous yellow, orange, and rusty red colors found in this season. Besides, it reminds me that CHRISTmas is around the corner. Yoo-hoo!! This year my family and I are also celebrating the 1st year in our new home, and that's why I decided to make the wreaths for our front door. They were not difficult to make, so I decided to share the tutorial with you.
 
Supplies you will need
I bought the vines at Michaels with my coupons, of course.  Here is the link with the tutorial for the bow. You can find the leaf garland at the dollar stores. The apple branches with flowers are from Southern Hospitality, but you can use different fruit and/or flowers depending on which season you will be using your wreath. And I'm pretty sure you have a glue gun, and glue stickers. If not, you can find them anywhere, even Walmart,  for a very reasonable price.
Glue the leaf garland on the vine first (I needed 2 for each wreath). I took some leaves out of the garland and glued them where I wanted them to stay. Glue the fruit branch, then glue the bow. Voilà, your wreath is ready. It can't get easier than that, and you can make one for each season or different holidays. 

Thank you for stopping by
God bless you, and Happy Fall,
Vanías Reed   

Thursday, September 18, 2014

Cute Turkey Thanksgiving Card

Another fall is coming, and I can't wait! I'm so ready for a cooler weather, aren't you? I mean, if you live anywhere in the south, of course. I know that my relatives and friends up in Michigan and Colorado are wishing it was spring coming instead of fall. (smile). Anyway, whether one prefers a cooler or a warmer climate, I'm pretty sure most of us enjoy to celebrate Thanksgiving with our families and friends. It is such an special holiday. To make it even more special, make a card to go with the dish you will bring, if invited to a dinner. If you are the host/hostess, a card will make your guests feel even more special. So here is an idea for you.
Supplies and technique used
Paper: rusty red, olive green, brown, yellow, rust, cherry red, orange, white, black, and cream
Tools: Cutting/ embossing machine, large polka-dot embossing folder, owl builder punch, flower punch, wave border punch, gift tag punch, fall-colors ribbon, brown pearls
Stamp: Happy Thanksgiving 
Ink: black

One of the reasons why I love this card is the amount of layers. I had so much fun making it. 

Thank you for stopping by. Celebrate any occasion with family and friends. Give handmade cards and gifts. But most of all, may God be always the center of all your celebrations
Vanias Reed    

Monday, September 15, 2014

A Fall Thank You

Hi there all Paper Creations, ETC fans. I want to thank you for following my blog, and tell you the good news. For commercial purposes I had to change my Etsy.com store's name. So I present you Crafts Basket . The blog and the Facebook page will keep the same name that you have liked and followed, Paper Creations, ETC that is - at least for now. So check out my store and find there the crafts you have enjoyed here and more. Here is one of the cards I'm selling there.

Supplies and techniques used
Paper: Rust red, mustard, vanilla, white, dark brown, brown, baby blue,   black, orange, forest green, and yellow cardstock
Tools: cutting/embossing machine, frame embossing folder, owl builder punch, scallop oval punch, oval punch, precision scissors, computer, and printer.
Embellishments: Pilgrim and Indian owls, sentiment phrase
Note: I handmade the Pilgrim's hat and collar, and the Indian's bandana and feathers.

Thank you so much for stopping by. May the Almighty God bless your day.
Vanias Reed  

Friday, September 12, 2014

Fall Button Wreath Card

I don't know if it is because earthly colors are my favorite, but just seeing fall decorations in the stores makes me smile. Living in a warm climate, I don't get to see the trees' leaves changing color, so I enjoy what the stores do, decorate my home, make cards and other fall projects. Here is another one of my autumn cards. Enjoy.
 Supplies and techniques used
Paper: rust red, grey, white cardstock
Tools: cutting/embossing machine, lace border embossing folder
Stamps: 'Happy Thanksgiving' sentiment phrase, olive leaves circle (I stamped this three times to get the thickness I wanted)
Ink: light and olive green
Embellishments: 1 yellow button (bigger than the others), olive green, rust red and orange buttons in different sizes, red yearn bow (passed through yellow button holes first)
No time for crafts? That's ok. You can find this and other cards in my Etsy store 

Thank you for checking out my paper creations. May God's abundant grace and mercy inspire you to create something beautiful.
Vanias Reed    

Thursday, September 11, 2014

Pumpkin Thanksgiving Card

Fall is almost here, and I'm loving it. When you live in a place where summer is extremely hot, the words fall and winter sound wonderful. Just the thought of a cooler weather inspired me to start making my Thanksgiving and Christmas cards. So here is the first one.
Supplies used
Paper: rust red, white, olive green, rust yellow, and brown cardstock
Tools: cutting/embossing machine, wave edge punch, scalloped oval punch, oval punch, 1 3/4 circle punch (to make the pumpkin - see my post 'Fall Ideas' from 09/03/2014), quilling tool (see picture below), computer, and printer.

Embellishments: green gemstones, pumpkin, paper ribbon.
Note: If you don't have a quilling tool, it's ok. You can use small cylinder to roll the pumpkin leaf.
Not much time for crafts? It is ok. You can find this and other of my cards in my Etsy store

Let's thank God for the blessings of family and friends, and give our family members, and our friends nice Thanksgiving cards. 

Thank you for stopping by. God bless you.
Vanias Reed     

Wednesday, September 3, 2014

Fall Ideas

What can you do with paper rosettes, a large circle punch, and a gift tag punch? A cute pumpkin to decorate your table, a gift... the possibilities are endless. Try this:
Then use a large circle punch to make leaves
Next make a gift tag
Then use your imagination and creativity to create something like this
Supplies needed
Tools: orange, cream and green cardstock, hot glue gun, got glue, large circle punch, gift tag punch, brown stamp ink (for the effect on the tag)

This is the kind of project that your children can help with, and turn it into a family tradition.
Thank you for stopping by. God bless you.
Vanias Reed