Saturday, May 2, 2015

Streusel Cinnamon Coffee Cake

One of the things I miss the most living so far away from my mother is when we would sit and have a cup of coffee with a slice of cake in the afternoon. Those were the moments we would talk pretty much about anything. Laugh together, cry together... So, Today I'm posting a recipe for an easy Streusel Cinnamon coffee cake. 


Cake Ingredients
1 cup flour
3 tsp baking powder
1 tsp cinnamon
3/4 cup sugar
1/2 tsp salt
1/2 tsp nutmeg (optional)
1/2 cup milk
4 tbsp butter, melted
1 egg
1/2 cup chopped walnuts or pecans (optional)
1/2 cup raisins or dry cranberries (optional)

Streusel Ingredients
3 tbsp butter, melted
3/4 cup brown sugar
2 1/2 tsp cinnamon
3 tbsp flour
1/2 cup chopped walnuts or pecans (optional)

Heat the oven to 350F  (If using a toaster oven, heat it to 325F)
Grease an 8x8 inches baking dish. 
In medium bowl mix dry cake ingredients and set aside. In another bowl whisk egg with sugar. Mix in milk, egg, and melted butter. Add dry ingredients, nuts, and raisins. Pour mix into greased 8x8-inches dish.
Mix all streusel ingredients and sprinkle it on cake batter. Bake for 15-20 minutes in regular oven, or 25-30 minutes in toaster oven. Let it cool for 10 minutes before serving.

Make the cake, let it cool completely, wrap it with cellophane paper, decorate with a beautiful bow, make a beautiful card or tag - or both- and bring it to your Mom on Mothers Day. Sit with her, have some cake together, and, most of all, give her your full attention. This recipe is mine, so feel free to copy it on a cute recipe card and give to someone you know to be a special mother - or just someone special. :)
I made this one yesterday and had a piece with my 9-year-old son. What a great time we had together. No TV, no smartphone, no tablet or computer of any kind. Just the two of us enjoying a piece of cake and talking.

Thank you for stopping by. I hope you make something beautiful and/or delicious and spend time with a loved one.

God bless you
Vanías Reed  


Tuesday, April 21, 2015

Shaker Box Card

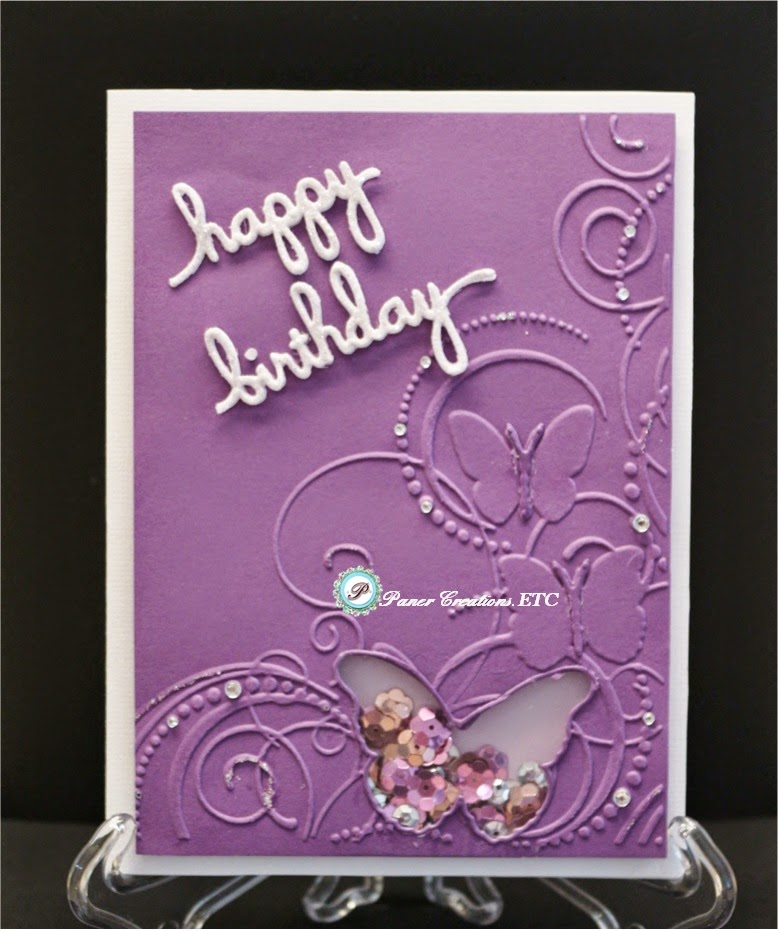
Hi. My niece, just like me, loves butterflies. So I wanted to make her a very special card that would not only have butterflies, but would be fun to. I found a class at craftsy in which Kimber McGray teaches how to make a card with a shaker box. So, I put my spin on it, and here is the result.
Supplies used
Paper: White, purple, lavender (for back of the shaker box, and glitter (also white) cardstock
Tools: Cutting/embossing machine, swirls and butterflies embossing folder (by Darice), happy birthday die (Memory Box), butterfly trio die (also memory box), 3D sticky foam, transparency, glitter glue
Embellishments: clear gemstones in different sizes, flower sequins (for the shaker box) 
By the way, I found the flower shaped sequins at Michaels after Easter sale for 0.59 cents. How cool is that?
Here is a close-up on the shaker box

This definitely was a fun card to make, and I'm pretty sure my little niece will enjoy shaking it. 

Thank you for stopping by, and have a wonderful everything. 
Vanías Reed


Tuesday, April 14, 2015

Mother's Day Card with Crochet Applique

Didn't we celebrate Christmas yesterday? hahahahaha. I cannot believe Mother's Day is just around the corner. Is it me or time is REALLY flying by? Wow! Anyway, here is an idea of a card for your Mom or someone you know who is a mom. What makes this card different is the crochet applique.
Supplies used
Paper: Cream, light green, brown and bright pink cardstock, roses scrapbook paper (The Paper Studios)
Tools: label punch, computer and printer
Embellishments: Crochet basket (find both the pattern and the applique here) , paper roses, aqua green ribbon and bow, brown self-stick pearls
This card can be made for several other occasions too, like birthday, Easter, spring, get well... the possibilities are almost endless. So, go ahead, make somebody's day by giving them something especially handmade by you. 
Thank you for stopping by, and may the grace of God reach your heart today.
Vanías Reed    

Sunday, April 12, 2015

Pop-up Card

Hi there. Today I'm posting a couple of ideas for pop-up cards. They are not difficult to make, and they have that surprise element that will sure put a smile on the face of the card receiver.

 Supplies used for this card:
Paper: Light and dark purple, white, cream with purple flowers, and white with blue strips cardstock. Green with white polka-dots scrapbook paper
Tools: Cutting/embossing machine, Swiss polka-dots embossing folder, scallop border punch
Stamp: Happy Birthday
Embellishments: balloons and cupcake stickers White ribbon
 
 Supplies needed for this card:                                                                  
Paper: Black, and white cardstock, leopard print, cream glitter, lacy, and white scrapbook paper
Tools: Fancy scallop punch, oval punch
Stamp: small Happy Birthday
Embellishments: red ribbon, red bow, large pearl, 2/3" red ribbon

To watch a video and learn how to 
make the pop-up click here 
Thank you for stopping by, and God bless you.
Vanías Reed    

Sunday, March 1, 2015

Transform a Note Card

If you follow this blog and/or my Facebook page, you know by now that I am all pro-recycling. For instance, the other day, cleaning up and organizing a drawer which cleaning was way overdue, I found some cute note cards that I bought before I started making my own cards (THAT tell you how overdue the cleaning and organizing were - smile). I looked at those cards and thought, "I can embellish these blank cards, and turn them into something with a little more 'pzazz', (word chosen by my 9-year-old son - LOL). So here is how I transformed a blank note card into a thank you card. 


How I did it
Paper: White and black cardstock
Tools: Cutting/embossing machine, medium rectangle decorative die (Spellbinders), 3D foam glue dots
Stamp: Thanks 
Embellishments: small pink pearls, swirl stickers.


As you can see in this picture, I used the black cardstock to make the back of my label.
 Thanks again for stopping by. I hope you have a wonderful week.
God bless you,
Vanías Reed  

Tuesday, February 24, 2015

Gifts or gift cards? (Last part)

Hi. To finish my series of posts on gift cards, I'd like to say that there are other reasons why to give them instead of gifts. Distance is one of them. A couple getting married and moving away, a high-school graduate going to a distant college, and serving in the army are just some examples of that. So here is another idea for a gift card holder.

Supplies Used
Paper: Light purple cardstock, polka-dots scrapbook paper
Tools: Embossing/ cutting machine, score board, extra-large and large oval dies (for handle), large scallop circle die.
Stamp: To, from
Embellishments: lavender pearl


Please remember that you can transform your handmade greeting cards into gift card holders too. Just use your imagination, and the technique in the video I posted the link to on my first post entitled 'gift or gift cards? (part 1)
Remember you can always make a greeting card/gift card holder in one, like I transformed the card I posted on Thursday, July 11, 2013 into a gift card holder (see picture below) to give to a bride who is going to live in another state after married.


In this case I just created a pocket inside the card, and crocheted a board using the same stitch used in the dress.
Thank you for checking out my ideas. I hope they are useful to you.
God bless you, and happy crafting, 
Vanías Reed 

Wednesday, February 18, 2015

Gifts or gift cards? (Part 2)

Yesterday I talked about how I prefer to get a gift card over a gift that has no meaning to me. By the way, what do you write on a thank you note when you get a gift that you don't like? Feel free to answer to that in the comment space below(smile). The gift card holder idea I'm posting today is for a masculine one, which can be used as a greeting card too. How clever is that? Here it is.

 As you can see, I used the same technique for the card holder itself.


Here you can see I stamped a birthday message to turn my gift card holder into a Birthday card.


Supplies Used
Paper: Dark blue, black and white cardstock paper
Tools: Embossing/cutting machine, top note die, large and medium oval punches, 1/16in circle punch, scorer board
Stamp: Birthday sentiment phrase (cover), Birthday message
Ink: black
Embellishment: white and black ribbon

Thank you for stopping by. I wish you a wonderfully blessed day.
Vanías Reed